
A simple guide for a simple configuration
Introduction
SAP typically creates and maintains an organization’s most critical data. But with the SAP mandate that your most critical SAP application, your Enterprise Resource Planning (ERP), must run on SAP S/4 HANA (powered by the SAP HANA database) by end the of 2027, it’s even more important than ever to have a fast, reliable and performant storage solution to meet your businesses growing needs.
But for most customers, the total cost of ownership (TCO) of an SAP HANA environment continues to be high due to its large memory requirements, licensing costs as well as an expensive Fiber Channel network required to meet the performance SAP HANA demands. Customers have long adopted NFS-based storage as a way to reduce some of the TCO and complexity for SAP HANA. SAP themselves have even started to adopt NFS as a standard way to connect to storage systems as they transform their customers to SAP RISE. But I’ve heard growing concern from customers that their current NFS storage providers just don’t deliver the performance and reliability needed for a mission critical system such as SAP. Well, help is here! Pure Storage has recently certified its FlashArray File services under the SAP HANA TDI guidelines (SAP TDI Matrix). In this post, I’ll guide you exactly how to install an SAP HANA system on FlashArray using the file services capabilities.
Getting Started
FlashArray //X is a unified block and file all-flash storage system designed for mission-critical workloads, such as SAP. I’m going to assume that the FlashArray has already been enabled to handle file services and a virtual interface for file has already been configured. The FlashArray support documentation does a great job walking through how this can be done. Once configured, the virtual interface will have an assigned IP address for use and can be found in the FlashArray network list.

FlashArray File Configuration
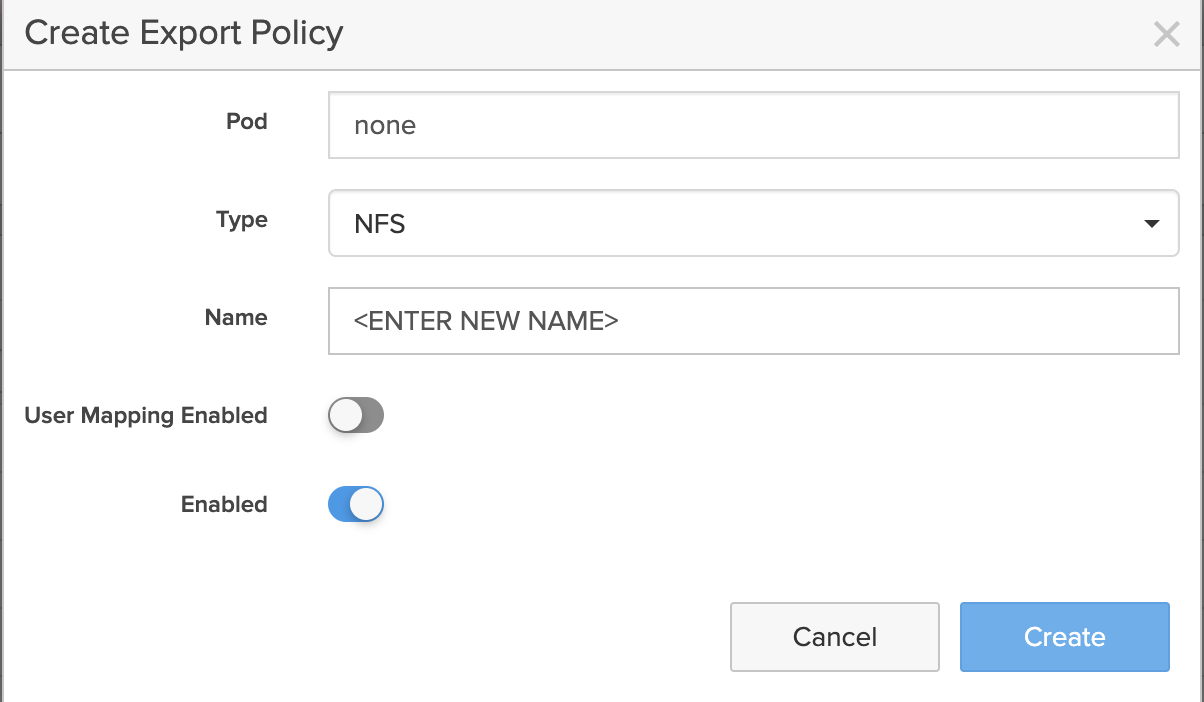
While block storage on FlashArray is configured through volumes, file storage is configured through export policies, quotas and file systems. I find it’s easier to configure the export policy first and add the directories as members after. In the storage section of the FlashArray UI head over the Policies tab and click the + to create a new Export Policy.

Next, ensure NFS is selected and give your Export Policy a name. Before clicking create make sure to toggle off “User Mapping Enabled”. This will allow the export to be accessed to the array without directory services – SAP HANA will not install without this! (Ask me how I know)
Once your policy has been created, you can then create your NFS export rule. Click on the + for Rules. Here you can add the SAP HANA clients which need access and ensure the Access is no-root-squash. Choose whether you’ll be using NFS v3 or v4 depending on your requirements and save the export rule when ready. Super easy!

Creating Your SAP HANA Directory Structure
The directory structure for SAP HANA is fairly simple, especially in a scale-up environment for databases under applications like S/4 HANA. You’ll need a /shared directory for the SAP HANA binaries, a /data directory and a /log directory as bare minimum for your database. Navigate to the File Systems tab in FlashArray UI and click on the + to create a new file system. Give it a name and away you go!
Once your root file directory is created you can create the /shared, /data and /log directories each with their own unique name.

Once your directories are created you can then add the export policy to each one for your NFS mount purposes. Give them each a unique Export name so your mount command can easily find what you’re looking for.

And that concludes the FlashArray section of this post! It really doesn’t get much simpler and you probably didn’t need this blog to figure it out but here at Pure Storage we make everything easy!
Mounting Your Directories
Now that the fun part is over it’s as easy as mounting your drives from your Linux host. Pure Storage recommends the following settings when mounting:
rsize=1048576,wsize=1048576,nconnect=8,hard,mountproto=tcp
This means your mount command will look like this:
mount <VIF>:<EXPORT_NAME> <DIRECTORY> -t nfs -o rsize=1048576,wsize=1048576,nconnect=8,hard,mountproto=tcp
For the HANA Log directory and Export that I created, my mount command for my /log directory was as follows:
mount 10.21.229.200:RyanHANALog /hana/log -t nfs -o rsize=1048576,wsize=1048576,nconnect=8,hard,mountproto=tcp
Do this for all three directories you created earlier – shared, data and log. And just like that you have an NFS setup ready for your SAP HANA installation.

Don’t forget to add those mounts to /etc/fstab so they’ll reconnect on start up!
Wrapping Things Up
In this post I showed just how simple it is to install SAP HANA on a Pure Storage FlashArray using NFS file services. Pure is committed to helping its customers with their SAP HANA transformation, no matter where you are in the journey. I know how hard it is to run an SAP platform and especially how hard it is to do an SAP implementation. Simple infrastructure is one way Pure Storage can help!
Please reach out to me with any questions or comments!